Uplifting Brands That Uplift Others

hello@upandup.agency
504 Rhett Street, Suite 100
Greenville, SC 29601
(864) 373-9330


hello@upandup.agency
504 Rhett Street, Suite 100
Greenville, SC 29601
(864) 373-9330


 digital marketing | digital media | digital strategy for higher ed | higher education | higher education website design | web development
Your website is your strongest marketing tool to attract the right students. Whether you’re launching a new website, planning for a redesign, or auditing your current state, it’s important to understand the benefits and how-tos of proper image optimization techniques.
Enhance the user experience
Your images are often the first thing that users see when they visit your page. Not only should the images be relevant and high-quality, but they also need to have accessible formatting for screen readers and search engines. A picture is worth a thousand words, so let’s make sure your images have the right context for the user.
Improve website speed and SEO score
Smaller image file sizes load quicker and require less bandwidth. If your website takes more than a few seconds to load, users are more likely to bounce and spend less time on the website. According to Google, three seconds is the optimal page load time for websites on both mobile and desktop devices. Factors such as image alt text and pagespeed directly affect your Google search rankings. Therefore, better optimized images decrease your bounce rate and increase overall performance.
Appear in image search results
Users find your page more easily when your website ranks higher in search engines. With Google’s image search-based results option, images are more important than ever in driving targeted traffic to your website.
Use the best format
When optimizing photography the best format to use is JPG, as it maintains quality, but removes unnecessary data. The PNG format is best used when your image needs to maintain transparency, either in the background or as part of the image, and file size isn’t as much of a concern. The SVG format is best used for vector-based illustrations and graphics—allowing you to manipulate parts of the SVG graphic, like color and size, using code.
First, always start with the end in mind. What will you use your photo or graphic for? Will it be large or small? A large hero image or a small inset image? Often, we take photos on our phones and upload them without editing for size or format. While your picture might look great at a glance, we often see two issues:
Vertical Orientation
People tend to take vertical photos, and those are usually not ideal for horizontal web image needs. We recommend horizontal photos in most scenarios.
Large Image Sizes
Typical phone cameras are usually 10 megapixels or more, generating images that are 4,000 pixels wide. Why does this matter? The bigger the size (in pixels), the larger the file size. We recommend always editing your images to be the correct size and resolution.
Ideally, you know the dimensions, especially the width, and you edit the image to that size before saving your image as a compressed file.
Next, know what type of file format to use for your image optimization. You should optimize your images manually with the appropriate image editing software. To do so, you need a basic understanding of the various file types, their benefits, and what software will work best. To determine usage, you have to know your image or graphic’s intended purpose and where it’ll live online.
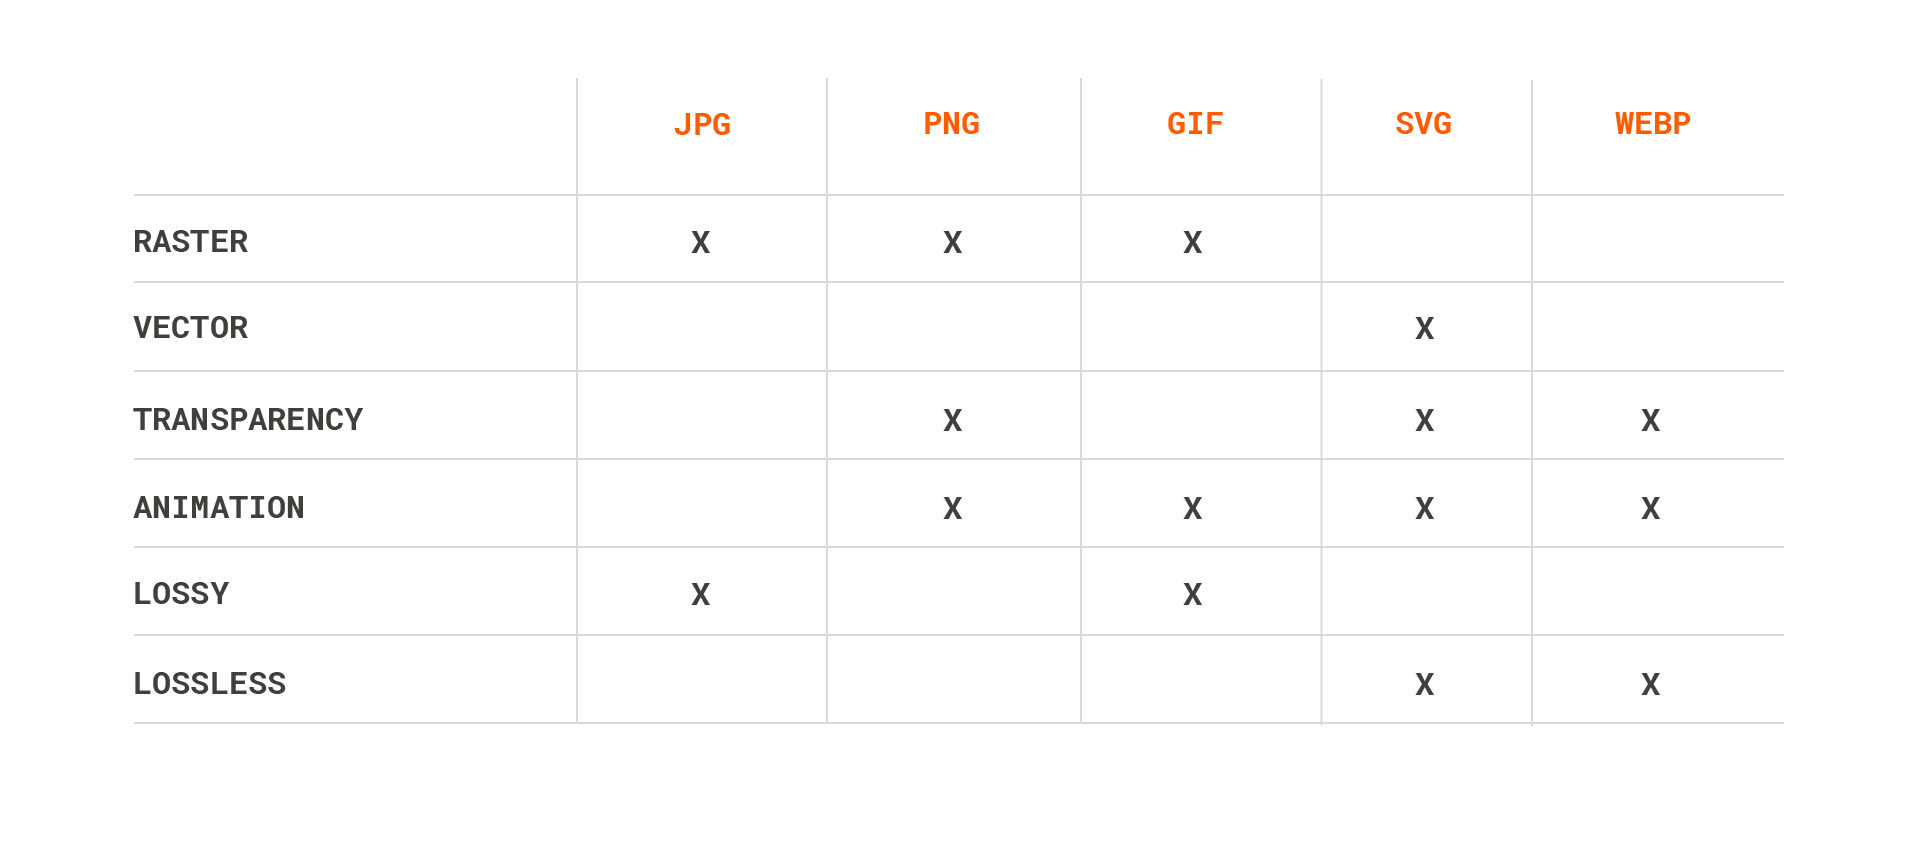
JPG/JPEG (Joint Photographic Experts Group)
This is the most common web file format, and our phone photos are often in this format by default. JPEG is a compressed image and best used for photography. Since it’s a resolution-dependent format, it’s not recommended for graphics and detailed illustrations, due to compromising the image quality as it scales up or down.
PNG (Portable Network Graphics)
This is a raster-graphics file-format that supports lossless data compression. This means there is no loss in quality each time it is opened and saved again. PNG is ideal for logos and web graphics because the format supports transparent backgrounds. The PNG file size will be larger than your standard JPEG, therefore it is not ideal for photographic images.
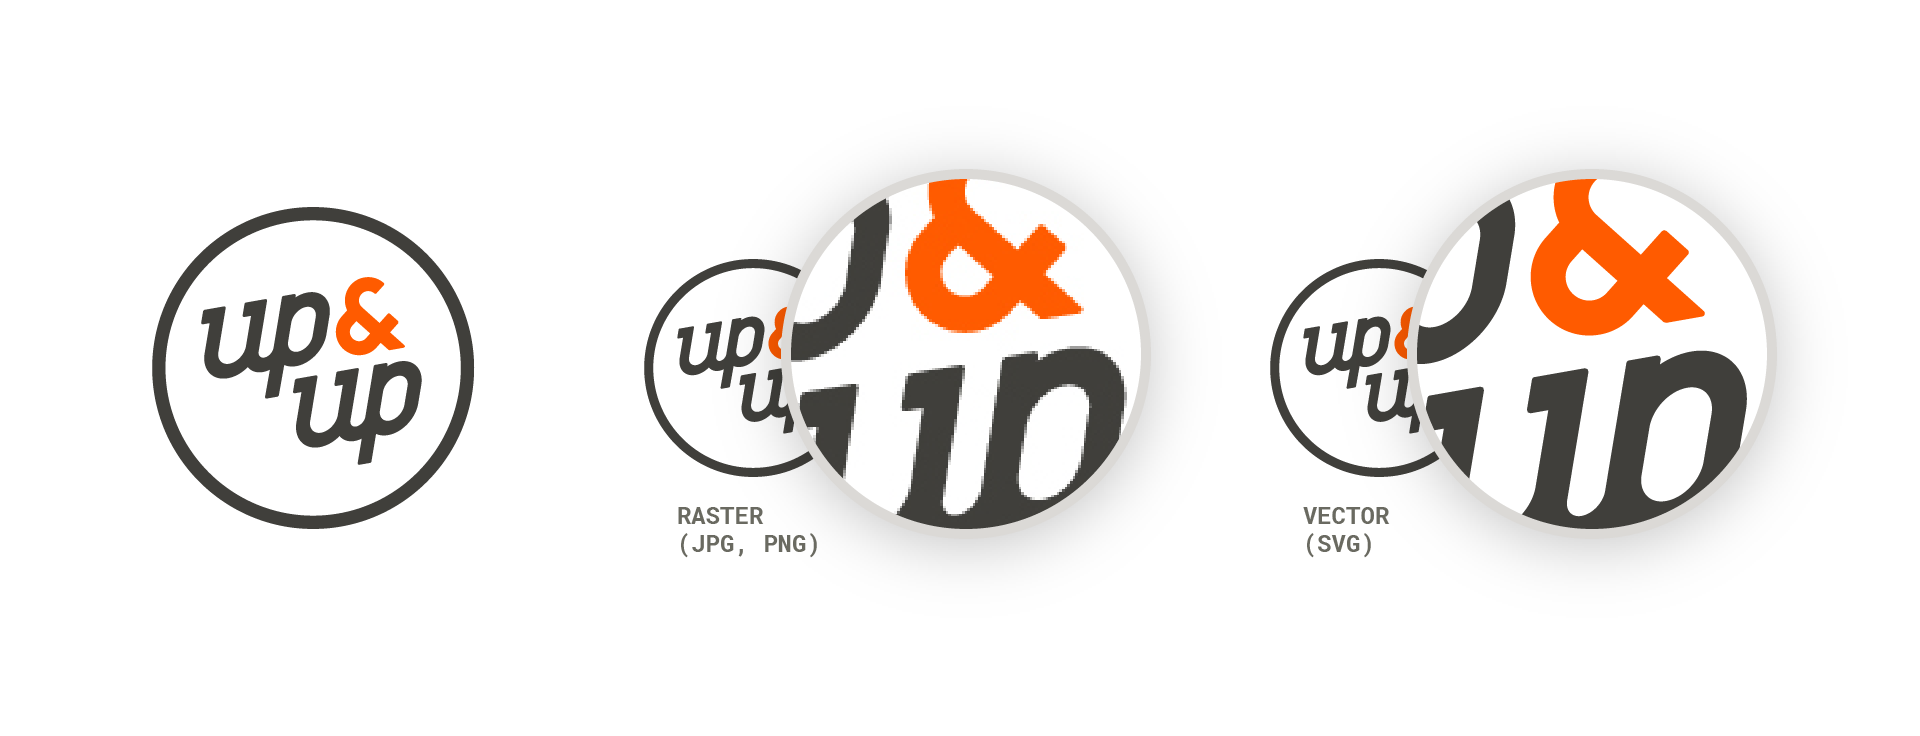
SVG (Scalable Vector Graphics)
Unlike raster-based formats, the vector-based SVG uses shapes, numbers, and coordinates (versus pixels in a bitmap) to serve images and graphics. This means the images can scale to any size and retain quality but often work best when the images are flat, simple colors. Vector images are best used for elements like typography, logos, icons, or illustrations since SVG doesn’t lose quality when compressed.
GIF – (Graphics Interchange Format)
It was originally created as a work-around to sending images to or from slow internet connections, or connections with low bandwidth. While GIFs are inherently lossless, they’re smaller than a comparable JPG because they only include up to 256 indexed colors. And while intended to be used for simple web graphics, they’ve grown in popularity because of their ability to create animated images and clips from videos—often used as viral memes and reaction GIFs often posted on social media.
WebP
This is a modern compression format for images on the web, using predictive coding to efficiently encode an image. It was developed by Google and it’s supported in Chrome, Firefox, Edge, and Opera browsers. WebP supports transparency and lossless compression when applicable, all while being ~26% smaller than a comparable PNG. It also supports animation, making it a great alternative for the GIF format. With its small file size, it’s also a preferred alternative to most universally supported file formats to optimize pagespeed. Because of its flexibility, it makes a great alternative to PNG, GIF, and even JPG formats. Keep in mind that it’s not universally supported by all browsers yet—but using tools like Autoptimize takes the guesswork out by automatically applying the WebP format when available.
Now that you have the basics covered, you can get to work.
Choose a Software or Service
There are various methods for image optimization, and there are many readily-available tools to help you do so.
Photoshop
You’ll need an editing software like Photoshop to size your photos at 100 percent of the desired size in pixels. If image editing and optimization comes up often in your role, Adobe offers multiple affordable plans for Photoshop licenses. If you don’t have or regularly use your license, you may opt for one of the below options.
Gimp
Gimp is a free, open source image editing, artwork creation, and graphic design software. It’s a great alternative for someone who doesn’t use Photoshop enough to justify the expense or just needs simple image editing capabilities.
ImageOptim
ImageOptim does one thing and does it really well: image file size optimization. It is offered as a web service and a free desktop app that allows you to quickly and simply optimize your images to balance quality and file size. The biggest shortfall of this application is that you won’t be able to crop or adjust any properties of your image with this software.
Image Resizer
Similar to ImageOptim, ImageResizer does one thing and does it really well: resize and crop images either by percentage or desired dimensions. ImageResize also gives you the option to flip and rotate your images. It even has a built in “target file size” tool, but it can be hit or miss in terms of quality.
Pixlr X
Pixlr X provides professional level photo editing in a free, online package. You have full control of your image, like adjusting brightness and contrast, and of course, the ability to crop and resize photos. It even has a touch-up tool to help you make things picture-perfect.
We recommend checking out this list of tools to see if any are a fit for you—most of which are free to use.
It might feel like your website has too many skeletons in the closet, but it’s never too late to make improvements.
Try out Autoptimize for serving your images in the most appropriate format and ShortPixel as a Content Delivery Network (CDN) for serving your images from a server closest to the end user for a quicker pagespeed. These two tools partnered together to offer integration of their features for streamlined use.
If you have a WordPress website, you can install the Autoptimize plugin. This will serve your images in the best possible format. For example, if the user is on the Chrome browser which supports WebP, it will create a WebP version of your image to present to that user— even though you uploaded an optimized JPG to your CMS. This reduces your need to create different versions of your images depending on what browser supports which file type.
This makes it a great tool for rapidly fixing the unoptimized images that have cluttered your website over the years. As you start to upload optimized images to your CMS after the initial cleanup, it helps to cover the range of file types you need. Best of all, the plug-in is free!
Shortpixel (basically a network of servers all over the world) then comes in to serve your image from a server closest to the end user. This makes the pagespeed quicker, a direct factor in how Google ranks your pages in the Search Engine Results Page (SERP). Shortpixel offers plans ranging from no cost to $30/month.
Google Developers on Image Optimization
Web.dev on Image Formats for Web
As crucial as image optimization is to many of our common digital obstacles, it’s just the start in making a website accessible and modern. Along with photography and graphics, content, design, functionality, and advertising all make up a well-oiled web presence. Whether you wear all the hats or have a team full of professionals ready to tackle your digital presence, there’s no better time to understand what makes a website effective.
client story, creative design, higher education, higher education website design, web development
digital marketing, digital media, digital strategy for higher ed, higher education, higher education brand strategy, higher education website design, web development